Category: Android Customization

  • How Do You Change Launchers on Android? (Step-by-Step Guide)

    How Do You Change Launchers on Android? (Step-by-Step Guide)

    1. What is a Launcher?
    2. Best Android Launchers You Can Try
    3. How to Change Launcher on Android?
      1. Step 1: Download New Launcher
      2. Step 2: Set Default Launcher
      3. Step 3: Customize the New Launcher
    4. How to Bring Back the Default Launcher?
    5. FAQs (Frequently Asked Questions)
      1. 1. Can changing the launcher slow down the phone?
      2. 2. Will changing the launcher affect the phone’s warranty?
      3. 3. Can I install more than one launcher?
    6. Conclusion

    One special thing about Android is that it gives full freedom of customization. If you do not like the default launcher of your phone or want to try something new, then you can easily change your launcher. In this blog, we will see step-by-step how to change launcher on Android.

    What is a Launcher?

    Launcher is a type of UI (User Interface) that decides the look and feel of your home screen, app drawer, and overall navigation. Different launchers give you access to new themes, icon packs, and gestures.

    Best Android Launchers You Can Try

    If you are looking for new launcher options, here are some popular launchers you might like:

    • Nova Launcher – Highly customizable and fast.
    • Microsoft Launcher – Best for users of the Microsoft ecosystem.
    • Poco Launcher – Lightweight and clean UI.
    • Apex Launcher – With smooth animations and gestures.
    • Niagara Launcher – Minimalistic and distraction-free experience.

    How to Change Launcher on Android?

    You can easily change your phone’s launcher, just follow the steps given below:

    Step 1: Download New Launcher

    First of all, you have to download a new launcher. You can go to Google Play Store and install the launcher of your choice.

    Step 2: Set Default Launcher

    After the launcher is installed, follow these steps to set it as the default launcher:

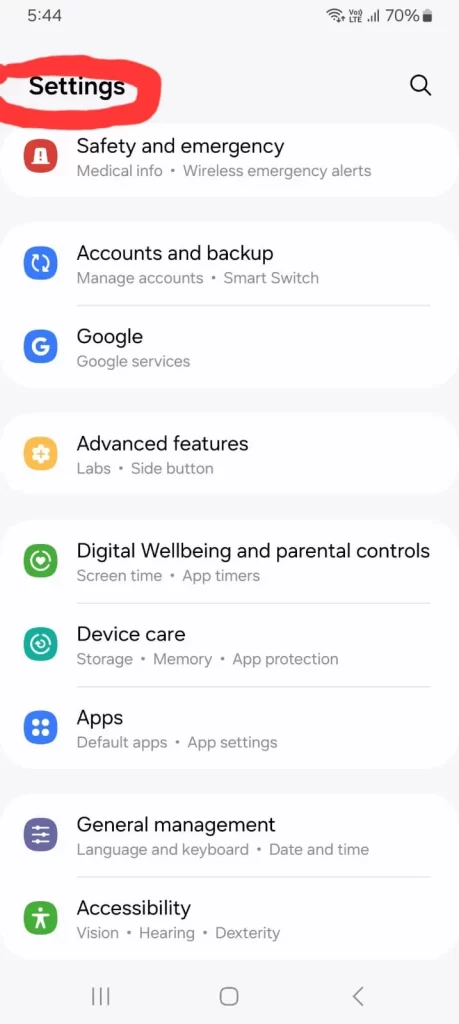
    1. Go to Settings.
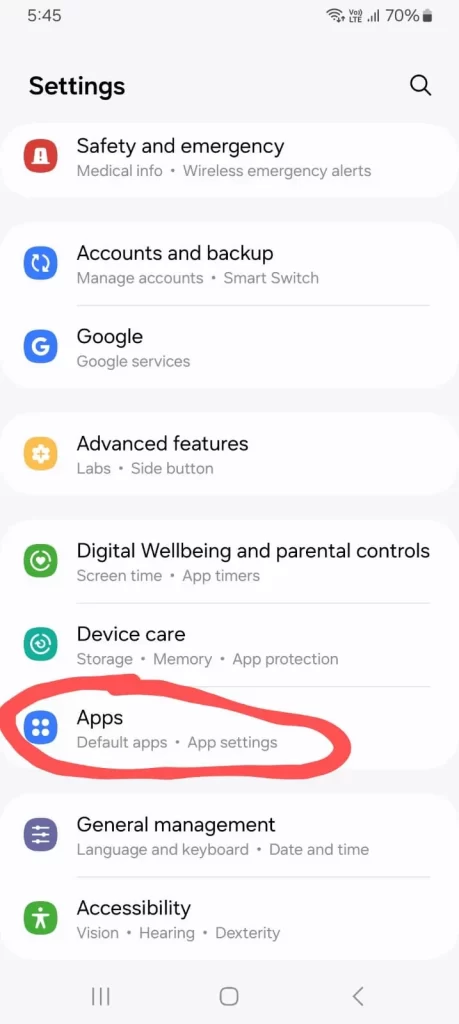
    2. Enter the Apps or Applications section.
    3. Tap on the Default Apps option.
    4. Select the Home App or Launcher option.
    5. Select your newly installed launcher.

    Step 3: Customize the New Launcher

    Now that your launcher is set, you can customize it according to your needs. Every launcher has its own unique settings such as:

    • Changing themes and wallpapers.
    • Using Icon Packs.
    • Setting Gestures and Shortcuts.

    How to Bring Back the Default Launcher?

    If you want to bring back the original launcher, follow these steps:

    1. Go to Settings > Apps > Default Apps.
    2. Select Home App.
    3. Select your phone’s original launcher (such as Pixel Launcher, One UI Home, MIUI Launcher).
    4. If you want to uninstall the new launcher, you can uninstall it by going to Settings > Apps.

    FAQs (Frequently Asked Questions)

    1. Can changing the launcher slow down the phone?

    Yes, if you are using a heavy launcher, then RAM and battery consumption can increase. Try lightweight launchers like Niagara Launcher or the lite version of Nova Launcher.

    2. Will changing the launcher affect the phone’s warranty?

    No, changing the launcher is a software-level customization that does not affect the phone’s warranty.

    3. Can I install more than one launcher?

    Yes, you can install multiple launchers and change the default launcher at any time.

    Conclusion

    Changing the launcher on Android is a simple process that can completely transform the look and feel of your phone. If you are feeling bored or want to explore something new, try a new launcher. If you found this guide helpful, share it with your friends!

  • How to turn off GPS on your Android phone?

    How to turn off GPS on your Android phone?

    If you feel that you do not need GPS or want to save battery, then you can easily turn off GPS on your Android phone. Turning off GPS is a simple process, and in this blog we will guide you step-by-step on how you can turn off GPS on your Android phone.

    Why is it necessary to turn off GPS?

    • Saving battery: Keeping GPS on drains the battery quickly.
    • Privacy Concerns: If you do not want your location to be shared, then it is necessary to turn off GPS.
    • Stop unnecessary apps: Some apps use your location, and disabling them may be helpful.

    Step 1: Turn off GPS from Quick Settings

    1. Pull down the notification shade: Swipe down your phone’s notification shade.
    2. Tap the Location icon: When you see the quick settings menu, there will be a “Location” or “GPS” icon.
    3. Tap to turn it off: Tap this icon, and your GPS will turn off immediately.

    Step 2: Turn off GPS from Settings

    1. Open Settings: Open your phone’s Settings.
      Find the Location section: Search for or scroll down to find the “Location” option in Settings.
    2. Disable Location: When you enter the Location section, you will find a toggle that needs to be turned off. This will turn off your GPS.

    Step 3: Turn Off GPS From App Permissions


    If you want to turn off GPS only for some apps, you can customize app permissions as well:

    1. Go to Settings: Open Settings.
    2. Select Apps & Notifications: Find the Apps and notifications section.
    3. Manage Location Permission: Under “App Permissions”, select the “Location” option.
    4. Turn Off GPS App Wise: Here you can see which apps have been given permission to access location. For apps that you don’t want to let use your location, turn off the toggle.

    Click here to read more: How to Turn Off an Android Phone [2025]

    Step 4: Turn off GPS in Battery Saver Mode

    1. If you put your phone in battery saver mode, GPS may turn off automatically. This option helps conserve battery:
    2. Go to Settings: Open your phone’s settings.
    3. Find Battery Section: Search for “Battery” section.
    4. Turn on Battery Saver Mode: Enabling battery saver mode will turn off your GPS automatically, and the battery will last longer.

    Step 5: Disable Google Location History

    1. If you do not want your location history to be tracked, disabling Google location history is also a good option:
    2. Open Google Settings: Open the Google app on your phone.
    3. Manage Google Account: Go to the Google account settings.
    4. Data & Personalization: Select the “Data & Personalization” section.
    5. Turn Off Location History: Here you will find the option of “Location History”, which you can turn off.

    Click here to read more: How to turn off Amber Alert on your Android phone

    Pro Tips for Location Privacy

    • Regularly check your location sharing settings.
    • Turn on GPS only when necessary.
    • Control location access by giving permission to apps.

    Final Words


    You saw how simple it is to turn off GPS on your Android phone. If you want, you can disable location through quick settings, phone settings, or app permissions. This will save your battery and you will also be able to maintain your privacy.

    If you found this blog useful, please share your experience by commenting below!

  • How to Change Facebook Layout on Android?

    How to Change Facebook Layout on Android?

    If your Facebook layout seems boring or confusing, don’t worry! Facebook lets you customize its layout, and you can easily do this on Android devices. If you want to change the look and feel of your Facebook, this detailed guide is perfect for you. Here’s a step-by-step process that’s both easy and effective.

    1. Update Your Facebook App

    First, make sure you update your Facebook app. The latest updates bring new layout features and customization options.

    Steps to Update Facebook App:

    • Open the Play Store on your Android device.
    • Type “Facebook” in the search bar.
    • If you see the “Update” option, tap it (if an update is available).
    • Open the app after it updates and explore the new features.

    2. Enable Dark Mode (Optional)

    Enable Facebook’s Dark Mode to give your app a cool, eye-friendly layout, perfect for those who browse at night.

    Steps to Enable Dark Mode:

    • Open the Facebook app.
    • Tap the three lines (≡) in the top-right corner.
    • Go to “Settings & Privacy”.
    • Select “Dark Mode”.
    • Tap “On” to enable Dark Mode.

    3. Built-in Options to Change Layout

    Customize different layout styles using the built-in options in the Facebook app.

    Steps to Customize Layout:

    Change Navigation Bar:

    • Go to “Settings & Privacy”.
    • Tap “Settings”.
    • Select “Navigation Bar” and add or remove your preferred shortcuts.

    Adjust Feed Preferences:

    • Go to “News Feed Preferences” in “Settings”.
    • Prioritize content by choosing “Prioritize Who to See First” to highlight your favorite pages and friends’ content.

    Customize Font Size:

    • Open the phone’s Display settings.
    • Adjust the “Font Size” to make Facebook more readable.

    4. Use Third-Party Launchers

    If you want more customization options, use third-party launchers to further personalize Facebook’s layout.

    Recommended Launchers:

    • Nova Launcher: Best for custom gestures and layouts.
    • Action Launcher: Ideal for a fast and smooth experience.

    Steps to Use a Launcher:

    • Download your preferred launcher from the Play Store.
    • Set up the launcher and select the “Default” option.
    • Customize the Facebook app as much as you like.

    5. Customize Browser Version Layout

    If you don’t use the app or prefer limited customization, you can also change the layout of the browser version.

    Steps to Customize Facebook on Browser:

    • Open Chrome or Firefox browser.
    • Log in to “m.facebook.com”.
    • Adjust display preferences in “Settings”.
    • Use the browser’s “Reader Mode” to create a more minimalistic layout.

    6. Join Facebook Beta Version

    Join Facebook’s Beta program to get early access to new features and layouts, offering a chance to explore experimental features.

    Steps to Join Beta Program:

    • Open the Play Store.
    • Search for the Facebook app.
    • If you see the “Join Beta Program” option, tap on it.
    • After the update, explore the new layouts and features.

    7. FAQs for Changing Facebook Layout

    Q1: Can I change the color scheme of my Facebook app?


    Yes, you can change the color scheme by enabling Dark Mode. For complete color customization, use third-party launchers.

    Q2: Is layout customization available on all Android devices?


    Yes, but some features may depend on device compatibility and app version.

    Q3: Are third-party launchers safe?


    Use trusted launchers verified on the Play Store, like Nova Launcher.

    Q4: Is there any risk in using the beta version?

    Beta versions are experimental and may have bugs, but they are generally safe.

    Conclusion

    Changing the Facebook layout is easy and customizable on Android. You can improve your Facebook experience by using built-in settings or third-party tools. Follow the steps above to make your Facebook layout more engaging.

  • How to Print Android Text Messages?

    How to Print Android Text Messages?

    Printing Android text messages is a simple process, but sometimes it can be confusing. If you need a physical copy of your important text messages, this detailed guide is perfect for you. Below is a step-by-step process to help you print your messages.

    1. First of All: Backup of Messages Is a Must

    You should take a backup of your text messages to ensure no important data is lost. The backup process is very simple and keeps your messages safe.

    Backup Options

    Use Google Drive:

    • Open your phone’s Messages app.
    • Go to Settings.
    • Select the Chat Backup option.
    • Enable Google Drive backup and connect to your Google account.

    Use Third-Party Apps:

    • If you don’t want to use Google Drive, you can use apps like SMS Backup & Restore.
    • Download and install the app.
    • Open the app and select the Create Backup option.
    • Save messages in XML or text file format.

    2. Exporting Messages

    After completing the backup, export your messages to make them printable.

    Steps for Export

    Using SMS Backup & Restore App:

    • Open the app and select your created backup file.
    • Click on the Export option and save the messages in PDF or text file format.

    Use of Screenshots:

    • If you don’t want to use backup apps, take screenshots of specific conversations and print them directly.

    3. Format Messages

    After exporting the messages, format them properly for readability before printing.

    Formatting Tips

    Edit in PDF Format:

    • Use a PDF editor to delete unnecessary parts.
    • Highlight important messages.

    Edit Text File:

    • If you exported your messages in text file format, open the file using Notepad or MS Word.
    • Divide long messages into separate lines and bold important sections.

    4. Setup Printer

    Now that your messages are ready to print, set up a printer and convert them into a physical copy.

    Steps for Printing

    Direct Printing from Phone:

    • Connect your phone to a Wi-Fi-enabled printer.
    • Open the exported file.
    • Select Print in the file options and customize settings (e.g., page size, layout).

    Printing via Computer:

    • Transfer the exported file to your computer (via USB or email).
    • Open the file and click on the Print option.
    • Connect the printer, adjust the print settings, and click Print.

    Important Tip:

    • If you don’t have a personal printer, visit a nearby cyber café or printing shop. Bring the file via a pen drive or email and get it printed.

    5. Organize Messages

    Organizing printed messages ensures they remain accessible and protected.

    Organizing Tips

    Use Folders:

    • Protect printed pages by storing them in a transparent folder.

    Maintain Digital Backup:

    • Along with the printed copy, save a digital copy of your exported file (on Google Drive or a pen drive).

    6. FAQs: About Printing Android Text Messages

    Q1: Can I print my messages without an app?


    Yes, you can print messages without any app by taking screenshots and printing them directly.

    Q2: Is it necessary to use any paid app?

    No, free apps like SMS Backup & Restore can handle the process easily.

    Q3: My printer is not Wi-Fi enabled. How do I print?


    Save the file on a pen drive and visit a nearby cyber café or printing shop to get it printed.

    Q4: Is this process secure?


    Yes, if you use trusted apps and save your files in secure locations, the process is absolutely secure.

    Conclusion

    Now you know how to print Android text messages. This process is simple if you follow the steps provided. By backing up, exporting, and formatting your messages properly, you can make them print-ready. If you face any issues, refer to the FAQs or seek help from an expert.

  • Snapchat Planets: What is this feature and how does it work? [2025]

    Snapchat Planets: What is this feature and how does it work? [2025]

    Snapchat has become an important part of our daily life, and new features keep coming on this platform. One such unique feature is “Snapchat Planets.” If you do not know about it or want to understand it in detail, then come to this blog where we will understand every small and big thing about this feature.

    What is Snapchat Planets?

    Snapchat Planets is a fun and interactive feature that visually represents the relationship between you and your friends. In this feature, the rank of you and your friends is shown in the form of planets in the solar system. This feature is mainly available to Snapchat+ (paid subscription) users.

    Snapchat+ is a premium subscription that gives Snapchat users access to exclusive features. It has a special feature called “Friends Solar System,” which we call “Snapchat Planets.” This feature shows your level of interaction with friends in a creative and engaging way.

    How does Snapchat Planets work?

    Snapchat Planets are based on the level of your friendship interaction. The friend who is closest to you in your Snap Solar System is your “Best Friend”, and their planet rank is Mercury. Similarly, the one who is a little farther from you is represented in the form of Venus, Earth, Mars, and the rest of the planets.

    Each planet has a unique meaning and rank:

    • Mercury: Your closest friend.
    • Venus: The second-closest friend.
    • Earth: The third rank in your friendship zone.
    • Mars: Fourth-ranked friends.
    • Jupiter: Fifth-ranked friends.
    • Saturn: Sixth-ranked friends.
    • Uranus: Seventh-ranked friends.
    • Neptune: Eighth-ranked friend.

    These rankings are based on real-time interactions and Snapchat’s AI algorithms. As you share more Snaps, chat, and maintain streaks with a friend, their rank may change.

    How to access Snapchat Planets?

    To see Snapchat Planets, you need to have a Snapchat+ subscription. If you have a subscription, you can see your friends’ planets by following these steps:

    1. Snapchat+ Subscription: This feature is exclusive to Snapchat+ users. If you are a Snapchat+ subscriber, you will see this on your friend’s profile.
    2. Open Friend’s Profile: Explore this feature by going to the profile of the friend with whom you have more interaction.
    3. Solar System Icon: You will find a small solar system icon that will show the rank between you and that friend.

    Snapchat+ Subscription Information

    Snapchat+ is a paid subscription service that gives you access to new and exclusive features. Some highlights of Snapchat+ are:

    • Unique Features: You get Snapchat Planets as well as other features like custom app icons, priority story replies, and exclusive badges.
    • Cost: Snapchat+ monthly subscription cost is around $3.99. You can also take a yearly plan which is a little economical.
    • Availability: This service is available only in selected countries. Its coverage is increasing.

    Taking Snapchat+ enhances your overall Snapchat experience and gives you premium user status.

    What is the significance of Snapchat Planets?

    Snapchat Planets feature has many benefits and interesting aspects:

    1. Relationship Understanding: This feature helps you understand which friend you have a stronger connection with.
    2. Interactive Design: The visual representation of planets like the solar system is a unique and fun way to see your friendship levels.
    3. Dynamic Nature: This feature keeps updating with time, so you can track your interactions with your friends.
    4. Exclusivity: Snapchat Planets feature is available only for premium users, which makes it even more special.

    Another benefit of this is that it motivates you to increase engagement with your friends. You are inspired to send more Snaps and have conversations.

    Snapchat Planets and a new way to explore friendships

    The Snapchat Planets feature is a creative and innovative way to explore your friendships better. It shows you how close you are to which friend and who is a little farther away. With this feature, you can make your friendship even stronger and more engaging.

    Some users’ real-life examples also highlight the importance of this feature. Like:

    • Riya and Priya: Riya saw that her best friend Priya is now on her “Venus”, and a new friend has arrived on Mercury. This increased her interaction with Priya and strengthened their bond.
    • Aman and Varun: Aman introduced his friend Varun through Snapchat Planets and they shared funny moments by discussing their rank.

    How can Snapchat Planets boost friendship?

    The Snapchat Planets feature can make friendship dynamics more interesting. Here are some things you can try:

    1. Set Friendship Goals: Improve your rank by interacting more with your friends.
    2. Fun Conversations: Start fun and engaging conversations by discussing your friends’ ranks.
    3. Create Competitions: See who can become your “Best Friend”.

    All these things will make your bonding with your friends stronger.

    FAQs (Frequently Asked Questions)

    1. Is Snapchat Planets available for free users? No, this feature is exclusive to Snapchat+ users only.
    2. Does the rank of Snapchat Planets change? Yes, the rank of planets can change depending on the interaction between you and your friends.
    3. How much does Snapchat+ cost? The cost of Snapchat+ varies depending on different regions. But the average cost is around $3.99/month.
    4. Is Snapchat Planets a permanent feature? This feature is linked with Snapchat+ subscription. You can use this feature as long as your subscription is active.
    5. If the interaction decreases, does the rank of the planet fall? Yes, if you reduce interaction with any of your friends, then their rank can shift towards lower planets.
    6. Does this feature impact privacy? No, Snapchat Planets only shows the interactions between you and your friends. This feature is private and cannot be seen by other users.

    Future Potential of Snapchat Planets

    Snapchat Planets is a feature that takes the interaction between friends to a new level. In the coming time, more new updates can come in this feature, such as:

    1. Customization Options: You will be able to customize the colors and designs of your planets.
    2. Group Planets: A separate solar system can be created for a group.
    3. Historical Data: It will be possible to compare the ranks of planets from previous months.
    4. Augmented Reality (AR): Viewing planets in AR and interacting with them can bring a new experience.

    All these things will make the Snapchat experience even more engaging and entertaining.

    Snapchat Planets is a futuristic and fun feature that blends technology and creativity. If you’re a Snapchat+ user, enjoy this feature and have more fun by discussing your ranks with your friends!
  • How to Print Out Text Messages from Android?

    How to Print Out Text Messages from Android?

    Sometimes you need to print out your important text messages, whether it is personal or professional. Printing text messages on an Android phone can be a bit tricky, but by following some simple steps you can easily print your SMS messages. Here we will tell you how you can print text messages from your Android phone.

    Why Would You Need to Print Out Text Messages?

    • Important Conversations: If there is an important conversation which you want to document.
    • Legal Reasons: Printing out text messages may be necessary in some legal matters.
    • Backup Purposes: You can print to take backup of your important messages.
    • Memory Preservation: You want to preserve some special messages of yourself or your loved ones.

    Methods to Print Out Text Messages from Android

    Method 1: Using Android’s Screenshot Feature

    1. Open the Conversation: Open your SMS conversation that you want to print.
    2. Take a Screenshot: Press Volume Down + Power button together to take a screenshot of your phone.
    3. Transfer to Computer: Transfer the screenshot from your phone to the computer.
    4. Print the Screenshot: Open the screenshot on the computer and print it.

    Method 2: Using SMS Backup and Restore Apps

    1. Download an App: Download an app like SMS Backup & Restore from the Google Play Store.
    2. Backup Messages: Use the app to backup your text messages.
    3. Export as XML or Text File: After backup, export the messages in XML or text file format.
    4. Transfer to Computer: Transfer the file to your computer.
    5. Print the File: You can print it by opening the file.

    Method 3: Using Email to Print Messages

    1. Select Messages: Select the messages you want to print on your Android phone.
    2. Copy and Paste: Copy the messages and paste them in your email.
    3. Send the Email: Send the email to yourself or someone else.
    4. Open on Computer: Open your email on the computer and print it.

    Method 4: Using Google Drive or Google Docs

    1. Copy Messages: Copy the messages from your Android phone.
    2. Open Google Docs: Open your Google Docs app or go to docs.google.com in the browser.
    3. Paste the Messages: Paste the messages in Google Docs.
    4. Save and Print: Save Google Docs and print from the computer.

    Tips for Printing Text Messages from Android

    • Ensure Proper Formatting: When you are transferring text, ensure that the formatting is proper so that the messages appear clear.
    • Use Trusted Apps: The apps you are using should be trusted so that your messages are secure.
    • Backup Messages Regularly: Backup your important messages on a regular basis so that no important message is lost.
    • Printer Compatibility: Ensure that your printer is properly connected and the file format is supported.

    Pros and Cons of Printing Text Messages from Android

    Pros:

    • Important Records: You keep a record of your important messages, which may be necessary for legal or personal use.
    • Easy Accessibility: You can easily print your text messages without any complicated process.

    Cons:

    • Formatting Issues: If you print SMS directly, formatting can get a little messy.
    • App Dependency: Some methods require apps, which are not available all the time.

    Printing text messages from Android has now become easy with the right tools. By following these methods, you can print your important messages, but always keep the privacy of your messages in mind!

  • How to Fix Radio Off on Android?

    How to Fix Radio Off on Android?

    Sometimes, you are listening to the radio on your Android phone, and suddenly you get a message of “Radio Off” or the radio turns off. This issue can be quite frustrating, but you can fix it by following some simple steps. Here we will tell you how to fix the “Radio Off” error on your Android phone.

    Why Does the Radio Turn Off on Android?

    • Network Issue: If your phone’s network is weak, then the radio may turn off.
    • App Glitch: Sometimes there may be a glitch or bug in the radio app that turns off the radio.
    • Software Issue: Your phone’s software issue can also be the reason for the radio to turn off.
    • Battery Saver Mode: If your phone is in battery saver mode, the radio app is not allowed to run in the background.

    Methods to Fix Radio Off on Android

    Method 1: Check Internet or Network Connection

    1. Check WiFi/Network: If you are listening to internet radio, check your WiFi or mobile data. If the connection is weak, the radio app will not work properly.
    2. Reconnect to Network: Turn off WiFi or mobile data, then turn it on again, and restart the radio app.

    Method 2: Restart Your Phone

    1. Restart Phone: Sometimes a simple restart solves the radio issue. Restart the phone and try again.
    2. Try Playing Radio Again: After the phone restarts, open the radio app and see if the radio is working properly.

    Method 3: Clear Cache and Data of the Radio App

    1. Go to Settings: Go to the “Settings” of the phone.
    2. Apps: Go to the “Apps” section and find your radio app.
    3. Clear Cache/Data: Go to the “Storage” option and click on “Clear Cache” and “Clear Data.”
    4. Restart App: Now open the app again and try to listen to the radio.

    Method 4: Update the Radio App

    1. Check for Updates: If your radio app is outdated, go to the Play Store and check if there is any update available.
    2. Update App: If an update is available, update the app and try again.

    Method 5: Turn Off Battery Saver Mode

    1. Go to Battery Settings: Open the “Battery” section in Settings.
    2. Disable Battery Saver: If battery saver mode is on, turn it off. This will allow the radio app to run in the background.
    3. Check Radio App: Now open your radio app and see if the issue is resolved.

    Tips to Prevent Radio from Turning Off

    • Keep Your Software Updated: Update your phone’s software regularly so that bugs are fixed.
    • Check for App Updates: Use the latest version of the radio app.
    • Stable Network: Always use a stable internet connection if you are listening to internet radio.

    Pros and Cons of Fixing Radio Off Issue on Android

    Pros:

    • Enjoy Radio without Interruptions: You can easily listen to your favorite radio station without interruptions.
    • Improved Listening Experience: If the issue is fixed, you can enjoy a better listening experience.

    Cons:

    • Temporary Network Issues: If there is a network problem, the radio app still will not work.
    • App Bugs: If the app bug is not resolved, the radio-off issue may occur again and again.

    Fixing the “Radio Off” issue on Android is pretty simple with the right steps. By following these methods, you can easily get your radio back on track and enjoy uninterrupted listening.

  • How to Create a Label in Gmail on Android?

    How to Create a Label in Gmail on Android?

    Creating labels in Gmail helps you organize your emails. Labels allow you to categorize, search, and manage emails with ease. If you’re using an Android phone, you can assign labels to your emails directly through the Gmail app. Here’s how to do it step by step.

    Why Should You Create Labels in Gmail?

    Organize Emails: Labels let you organize your emails by topics or categories. For example, you can create labels like “Work,” “Personal,” or “Shopping.”

    Access and Search Emails Easily: When you assign labels, you can easily search for your emails. Just tap on the label to view relevant emails.

    Manage Multiple Accounts: Labels help you organize emails from different Gmail accounts separately, avoiding confusion.

    Prioritize Emails: You can highlight important emails by creating labels like “Urgent” or “Follow Up.”

    Steps to Create a Label in Gmail on Android

    1. Open Gmail App: Open the Gmail app on your Android phone.
    2. Select an Email: Open the email you want to label.
    3. Tap on the Three Dots: Tap the three vertical dots (menu) in the upper right corner of the email.
    4. Choose “Label” Option: Select the “Label” option from the menu.
    5. Create New Label: Tap “Create New” to create a new label.
    6. Enter Label Name: Type the name for your label, such as “Work” or “Important.”
    7. Save the Label: Tap “OK” or “Save” to create your label.
    8. Apply the Label: Tap “Apply” to assign the label to your email.

    Click here to read more: How to Check Voicemail from Another Phone Android

    Advantages and Disadvantages of Creating Labels in Gmail on Android

    Advantages:

    • Better Organization: Labels help you organize your emails clearly and streamline your workflow.
    • Faster Email Search: Labels allow you to search for specific emails quickly without scrolling through your inbox.
    • Customizable: Customize your labels to organize emails according to priority.

    Disadvantages:

    • Too Many Labels Can Cause Confusion: Creating too many labels can make it hard to manage them.
    • Time-Consuming for Large Inboxes: Applying labels to a large number of emails can take time.
    • Not All Labels Are Visible: If you have many labels, some may not appear on the same screen.

    Using labels will simplify and enhance your email management, helping you organize emails and access them quickly.

  • How to Allow Push Notifications on Android

    How to Allow Push Notifications on Android

    In Android phones, you can easily get important information about your Android and third-party apps through push notifications. First of all, you have to go to the settings of your Android phone, select the application in the apps section for which you want notifications and enable push notifications. This way, you will not miss any offer or message. In this blog, we will guide you, so that you can easily enable push notifications and your Android experience can be better.

    Understanding Push Notifications and Their Importance on Android

    This is an alert message that you get through push notifications on your Android phone. This real-time communication is very important for notifications like you get updates on social media activities, application updates, offers, news, and similar things. It increases your engagement and improves your performance. That’s why we want you to always stay updated and connected so you can get updated with push notifications related to your work and also stay updated on other activities like entertainment news, etc.

    How to Enable Push Notifications for Specific Apps on Android

    Here we will guide you how you can enable push notifications for your favorite apps or useful apps, or any apps that you find useful. You can easily enable push notifications by following the steps given below:

    1. Go to the settings of your Android phone.

    Opening the settings on Android phone

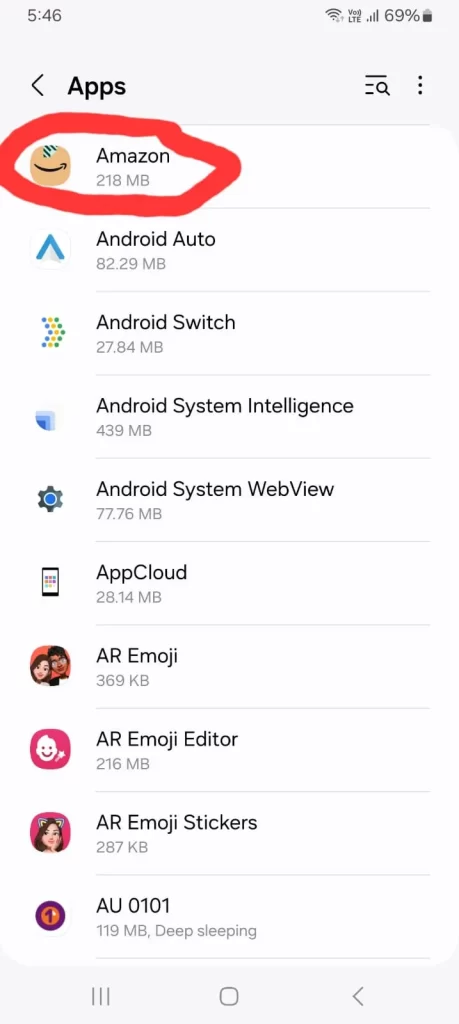
    1. Scroll down and click on the option of “Apps“. As soon as you click on “Apps“, you will see many applications.

    Accessing the "Apps" section in Android settings to view all applications

    1. Click on whichever application you want push notification for.

    Selecting an app for push notifications in Android settings

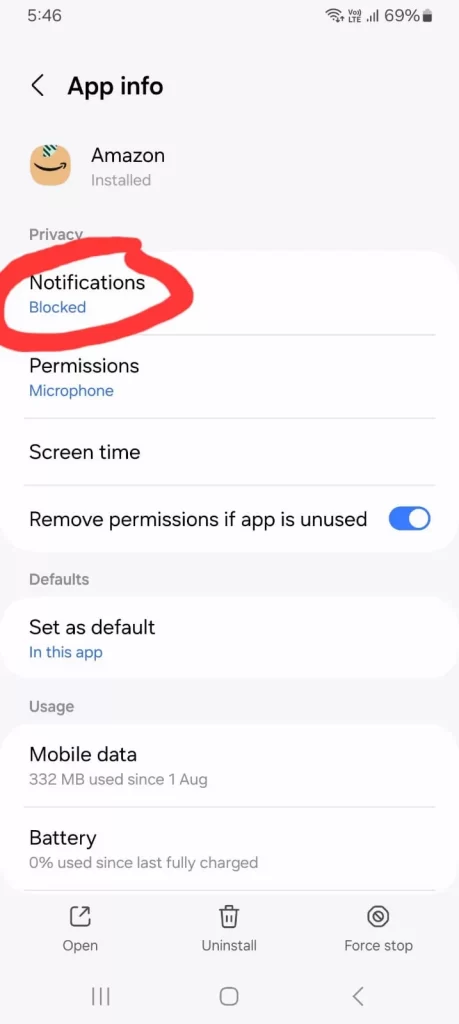
    1. Then you will see the first option of “Notifications“, click on it.

    Accessing the "Notifications" settings for an app in Android

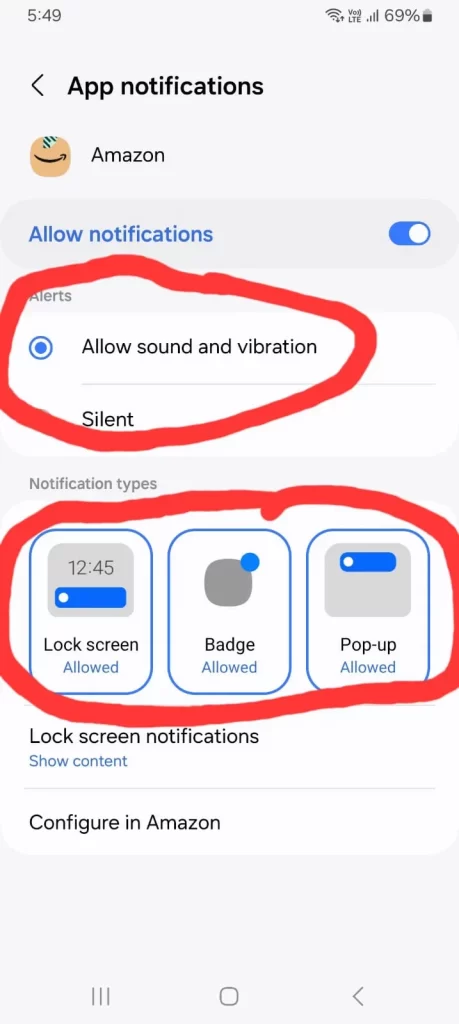
    1. After that the button of “Allow Notifications” will appear, allow it.

    Enabling push notifications for an app on Android device

    Customizing push notification preferences (sound, vibration, lock screen, pop-up) on Android

    1. Then you can see what type of push notifications you want, like “Allow Sounds and Vibration” or “Silent” — it will depend on your preference. Below you will also get the option of what type of notifications you want, like “Lock Screen“, “Badge“, and “Pop-up“. Select the one that suits you best. 

    By following these steps, you can turn on your push notifications.

    Conclusion

    In a simple way, you can easily enable push notifications on your Android device and make your work or daily life easier with important notifications. Push notifications provide you real-time updates, which helps you to stay updated always.

    You can also customize notifications according to your needs in Android phone settings, so that you can see your priority tasks first and disable those notifications which are not important for you. This way you can save your time and stay away from distractions.

    By following this knowledge, you can make your Android experience much better and productive by making the best use of push notifications.

  • What Is QuickStep on Android Phone?

    What Is QuickStep on Android Phone?

    Android phones have a default launcher called “Quickstep” that helps users navigate the device’s app drawer and recent apps. It is designed in such a way that users can seamlessly switch between apps and get an easy way to perform actions on the Android device.

    Understanding QuickStep: The Default Launcher on Android

    The Android launcher is a very important part of your phone’s interface, which manages the home screen and app interactions. As I explained above, QuickStep is the default launcher that provides users with a seamless integration with Android’s core features. Whether you’re customizing apps on your phone or navigating through apps, QuickStep provides an experience that’s specially designed and optimized for Android devices, based on user needs.

    How QuickStep Enhances Your Android User Experience

    QuickStep improves the Android user interface from normal functionality to a modern design and enhanced usability. Like with the help of the custom gestures feature of swipe, you can access recent apps or quickly switch screens. This lets you do your daily important tasks quickly and efficiently. This feature helps you to do more work in less time and completes the work smoothly.

    Features of QuickStep on Android Phones

    QuickStep has many key Android features that give you a smooth and great experience:

    • Home screen customization: In this, you can easily arrange your apps and widgets where you want, according to your needs.
    • Integrated gesture navigation: In this feature, you can access apps or do many tasks together very easily, which saves your time and gives you a good experience.
    • Google Feed integration: You can access personalized updates directly from your home screen.

    With all these features, QuickStep gives users a next-level experience with Android devices.

    How to Customize QuickStep on Your Android Device

    To customize QuickStep as per your needs, follow the steps given below:

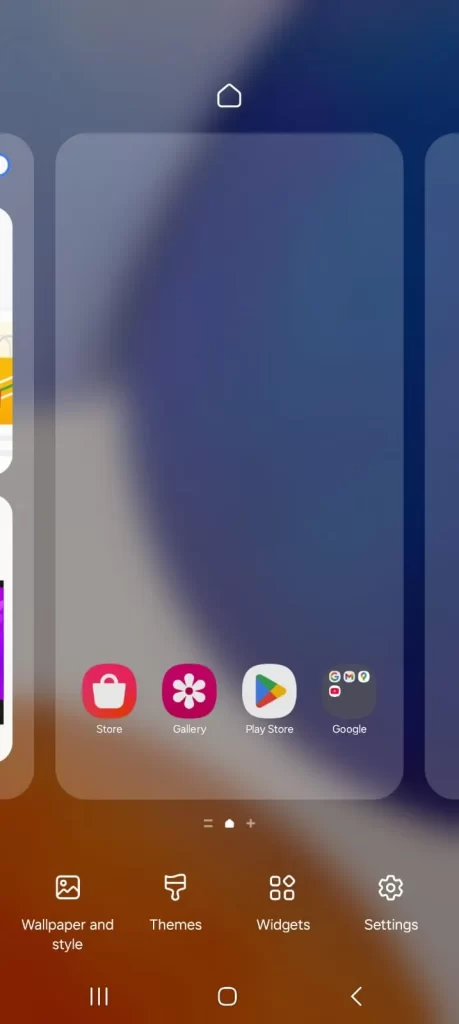
    • Leave the Home app on your phone and long press anywhere on the screen.
    • Then you will see some options on the screen, like Wallpaper and Style, Themes, Widgets, and Settings. You can choose any of these options.
    Selecting options such as Wallpaper and Style, Themes, Widgets, and Settings on Android
    • If you want to change your Android launcher, go to Settings > Apps > Default apps > Home app and select an alternative launcher of your choice.

    Here I am going to tell you which launcher is best for us and how it helps us in becoming more productive on a daily basis. I am also going to show you the steps to set up the default launcher in detail.

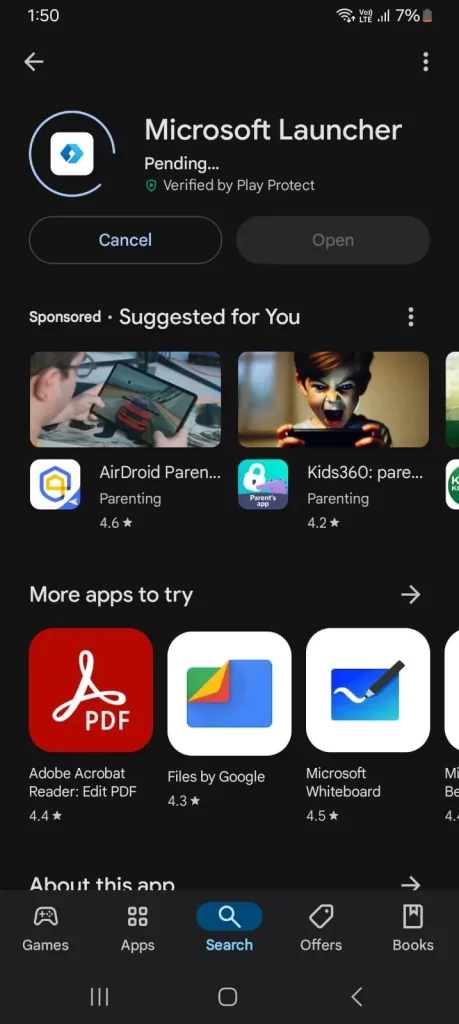
    1. First go to Google Play Store and install Microsoft Launcher app.

    Installing Microsoft Launcher from Google Play Store on Android

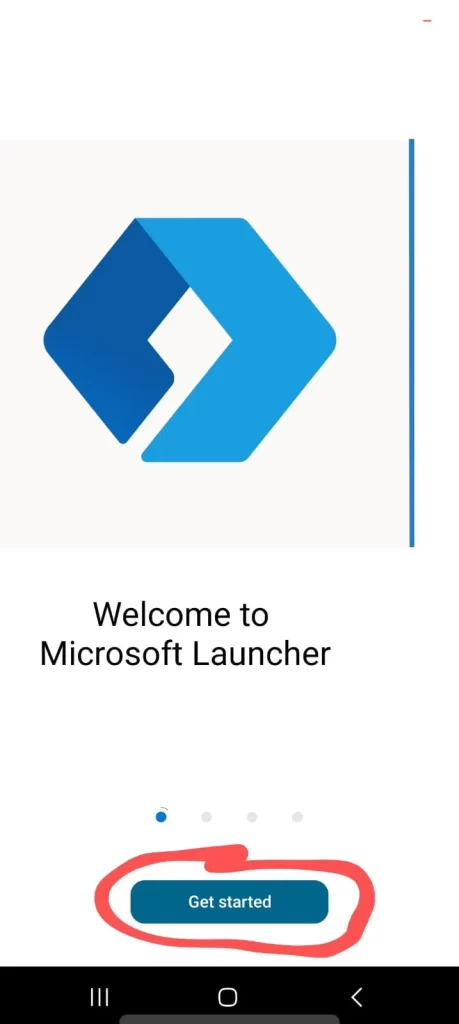
    1. As soon as you open the application, just click on the “Get Started” button.

    Clicking on the “Get Started” button in Microsoft Launcher on Android

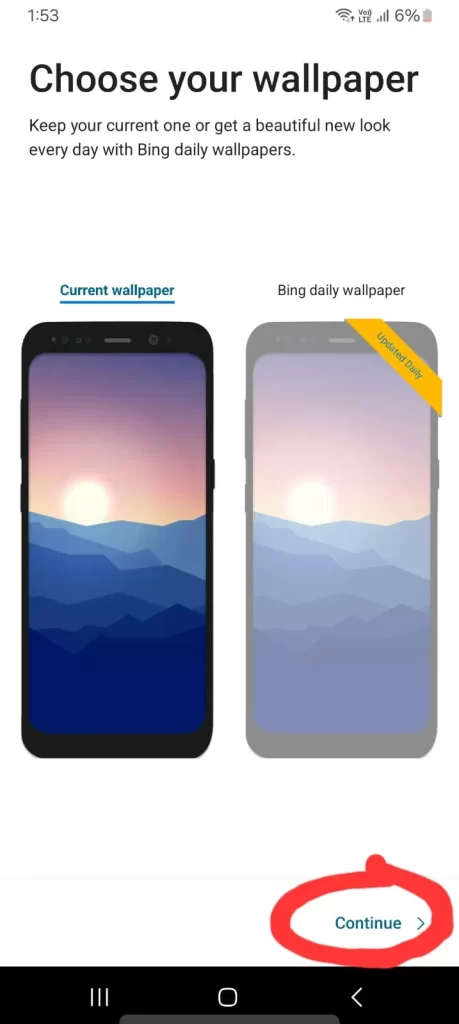
    1. Choose your wallpaper and click on the “Continue” button.

    Selecting a wallpaper and clicking Continue in Microsoft Launcher on Android

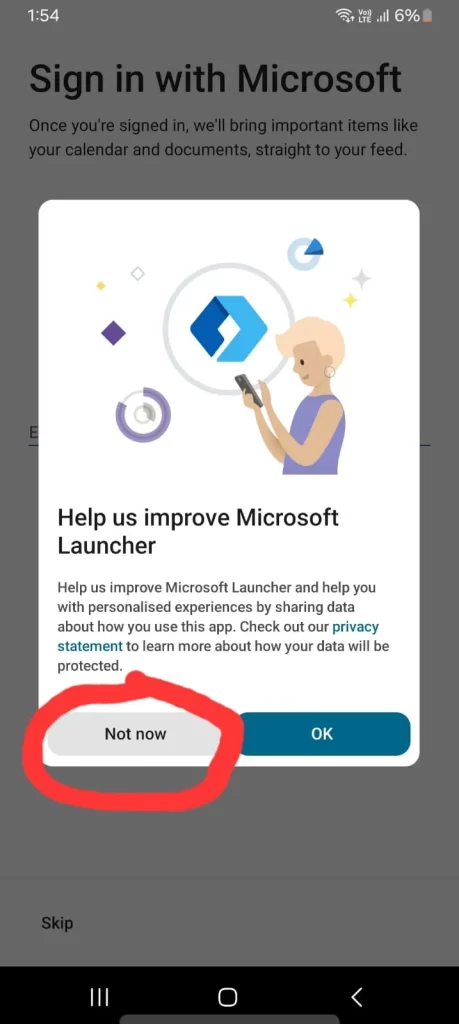
    3. If you have a Microsoft email account, sign in; if not, you can skip the sign in process. After clicking on the “Next” button, you will see two options: “Not Now” and “OK”. Click on the “Not Now” button.

    Signing in with Microsoft email or skipping sign-in, then clicking "Not Now" in Microsoft Launcher on Android

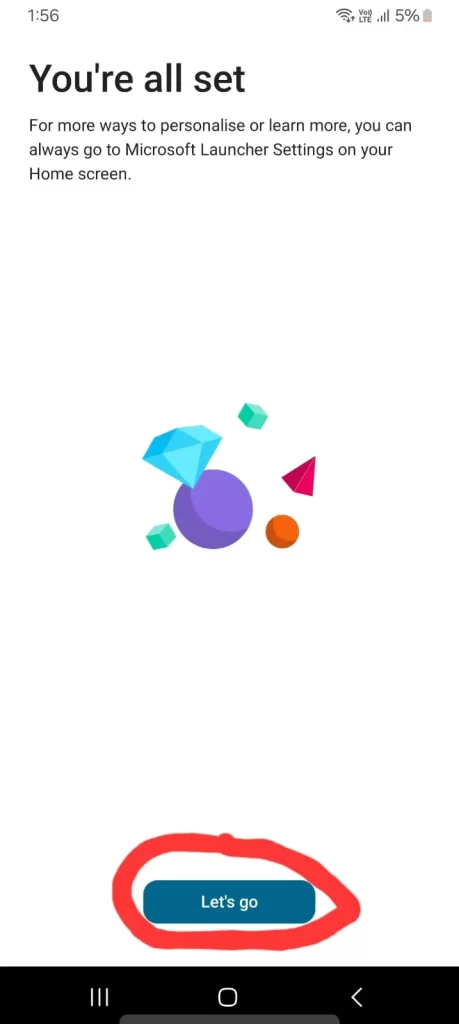
    4. Now you will see the “You are All Set” page, and at the bottom you will find the “Let’s Go” button. Just click on it.

    Clicking the “Let’s Go” button on the “You are All Set” page in Microsoft Launcher on Android

    Now, we will show you how you can setup the installed Microsoft Launcher on your Android phone:

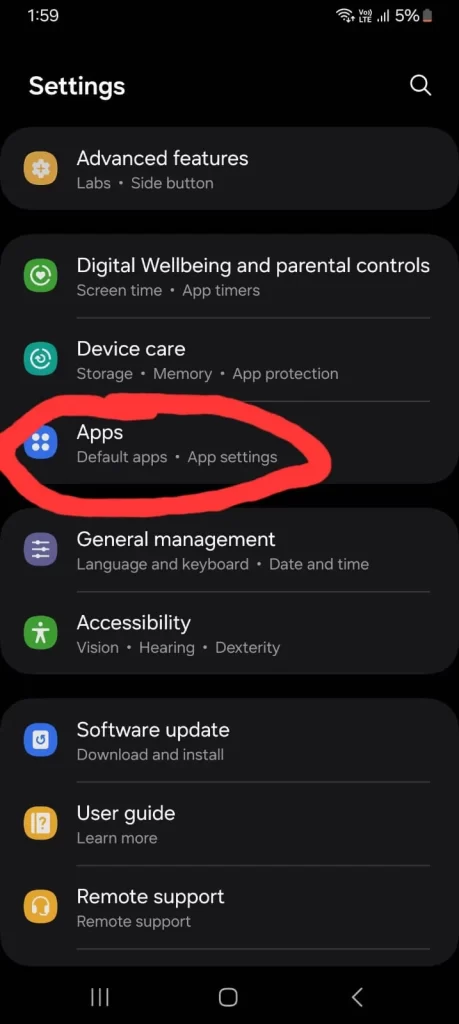
    1. Go to your phone’s settings. There you will see the “Apps” option, click on it.

    Navigating to the "Apps" option in phone settings on Android

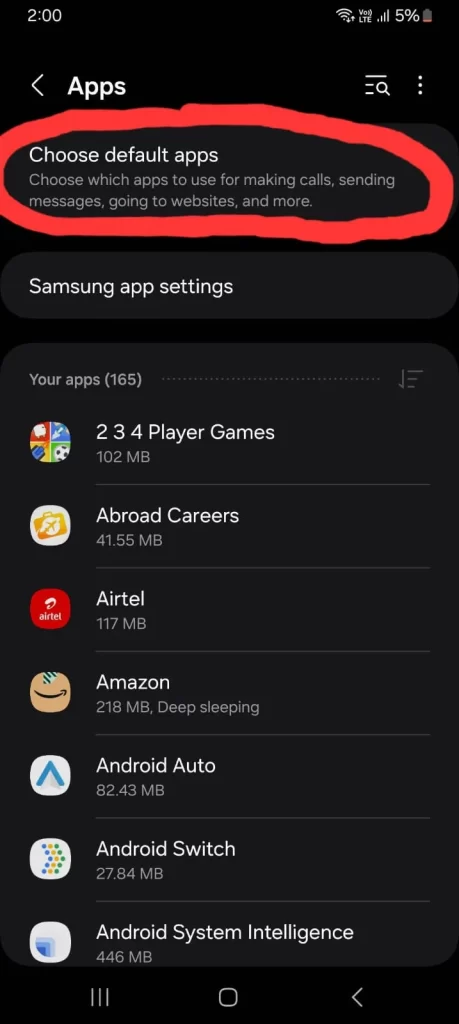
    1. In the Apps section you will find the “Choose Default Apps” option, which we have marked in the snapshot. Click on it.

    Clicking the "Choose Default Apps" option in the Apps section on Android

    1. Now you will see the “Home App” option, click on it.

    Selecting the "Home App" option in Android settings

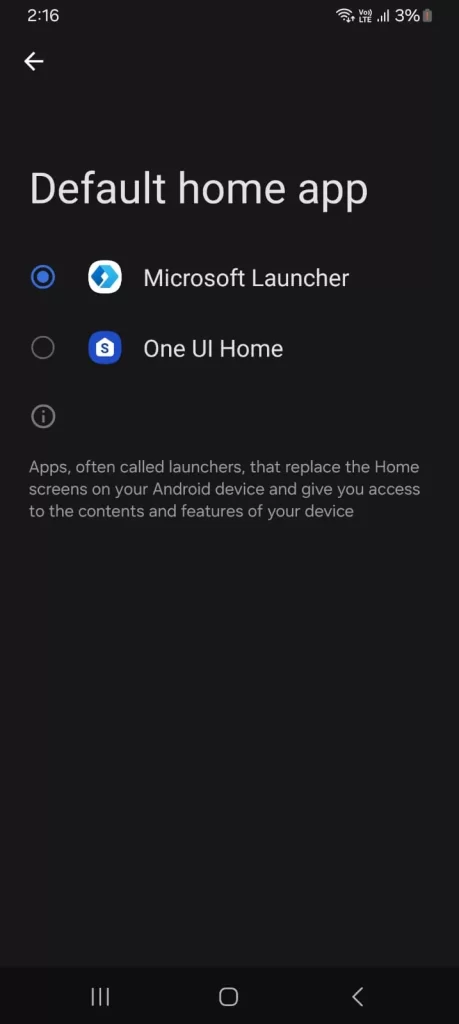
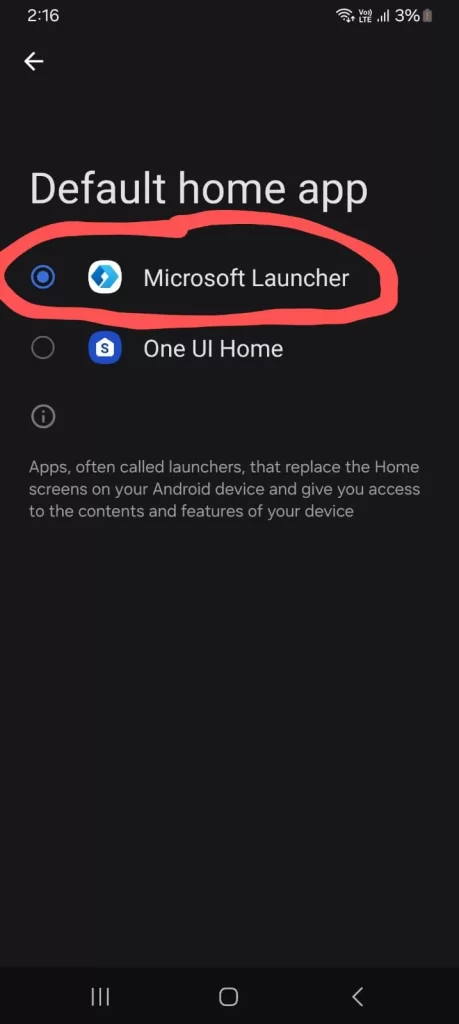
    1. Here you will get two options: Microsoft Launcher (which we have downloaded) and One UI Home (inbuilt phone launcher).

    Selecting Microsoft Launcher or One UI Home in the Home App settings on Android

    1. Click on Microsoft Launcher, and now your Android phone’s launcher has been successfully changed.

    Changing the Android phone’s launcher to Microsoft Launcher

    Conclusion

    QuickStep is a very important part of Android devices which gives users a very effective experience. This default launcher helps you a lot in navigation, customization, and multitasking so that your work becomes easier and you can get more work done in less time. This makes it easier for you to use applications and also gives good performance. With features like home screen customization, gesture navigation, and Google Feed integration, you can use your Android phone smoothly. QuickStep provides you with a modern interface, which is well designed keeping in mind your Android needs, so you can easily use QuickStep in Android devices.

    If you want more productivity and personalization, customizing QuickStep or switching to another launcher, like Microsoft Launcher, can improve your Android experience. By following simple steps you can set up your device to your needs, making your phone more efficient and enjoyable. Whether you’re navigating apps or customizing your home screen, QuickStep optimizes your Android experience for both functionality and style.